Deliver your apps using Azure Front Door
Azure Front Door

Frequently I speak to cloud admins and consultants who’ve heard about Azure Front Door, but are not sure about what it does or havent interacted with it. I have some experience deploying and managing Front Door instances of customers. Most heard comment is: “It’s a thing that does something with application delivery, right?”. In the near future I want pursue on the AZ-700 certification, so I thought a win-win in blogging about! With this blog I want to show what Azure Front Door is, what the components are and make sure to mention a few gotcha’s.
At the end of this article hopefully you’ll be able to answer these questions:
- Where can I configure free valid certificates for my Front Door hosted site/app?
- Where can I configure Front Door load balancing for the hosts I’m routing/redirecting traffic toward to?
- Where can I control which requests are forwarded/redirected to which hosts?
- How does Front Door deliver webtraffic to my users?
Overview
Another Load Balancer service?
Before we dive in some background information is relevant. Because Azure Front Door takes a specific role in the Azure Load Balancing options. There are several load balancers in the Azure native portfolio:
- For global DNS loadbalancing scenario’s, Azure Traffic Manager can be used.
- For load balancing network (HTTP(S) and non-HTTP(S))traffic to Virtual Machines or Virtual Machine scale sets, Azure Load Balancer is a fine choice.
- For regional HTTP/HTTPS load balancing, TLS-offload and Web Application Firewall functionalities Azure Application Gateway is a great option.
This Microsoft Docs article provides an excellent overview of the portfolio of Azure Load Balancing options.
Components
Front Door provides the following functionalities:
- Forwarding/redirecting requests to backends/urls as a reverse proxy and load balance HTTP-requests.
- Shape or rewrite the request url, body or headers.
- Layer 7 HTTP(S) Web-Application Firewall scanning of traffic.
- Provide a cached version of content to the user by providing CDN-functionality.
There are more vendors that provide similar functionality, however Front Door’ strong points lie in the tight integration with Azure resources and above all the fact that it’s deployed in each Azure POP, which makes it a globally scaleable service. With the caching options and WAF you can deliver apps fast and safe to all users across the world. And it’s all manageable via the Azure Portal, not via another internal management panel on a Network Virtual Appliance.
Reverse Proxy
In computer networks, a reverse proxy is a type of proxy server where the servers return resources to the client where it would appear to the network that it originated from the reverse proxy server itself. It is mainly used to balance load.
From: https://en.wikipedia.org/wiki/Reverse_proxy
In the case of Front Door this means that requests to url’s will be sent to Front Door and the Front Door forwards the traffic to the backend.
The reverse proxy functionality is the most important function of the service. With the reverse proxy all traffic flows through the Front Door. This paves the way for monitoring options, allows you to scan traffic with the Web Application Traffic, but also allows you to provide cached versions of your content. Traffic routing has 3 main components within Azure Front Door:
- Frontend Domains
- Backend Pools
- Routing Rules
Frontend Domains
The frontend domain is the component with which you can start to define your customer experience before they’ve even loaded your website. It can be an asset in your branding, but also become a convenient tool (who likes remembering servernames right?). Typing in the frontend domain is usually the only user interaction most users have with the url. The rest is mostly the system administrator and webmasters concern.
In Azure Front Door the frontend domain configuration panel is also the spot where you: onboard your custom domains, configure certificate settings for your custom domains, and configure session affinity for your backend hosts.
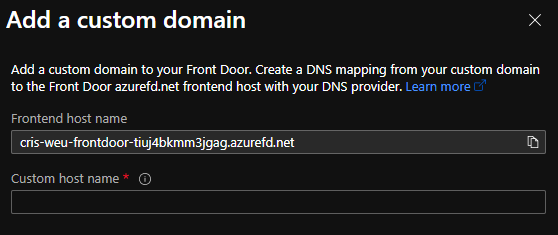
Onboarding Domains
By default the name of your Azure Front Door is used to provide you with a fresh start i.e. [{name of the Front Door}.azurefd.net]. Onboarding of domains is done via CNAME records, root/apex/naked domains are also supported via alias’s via Azure DNS.
Subdomains are onboarded using CNAME records, where you reference your subdomain as the source domain and point to the frontend host(name) of your Front Door [{name of the Front Door}.azurefd.net] as the destination. After verification the domainname is available in Azure Front Door. You don’t have to directly CNAME your domain initially, you can do the onboarding with afdverify.{customdomain} i.e. afdverify.www.my90ieswebsite.tk.
Onboarding root domains is documented at Microsoft Docs: Onboard a root or apex domain on your Front Door.
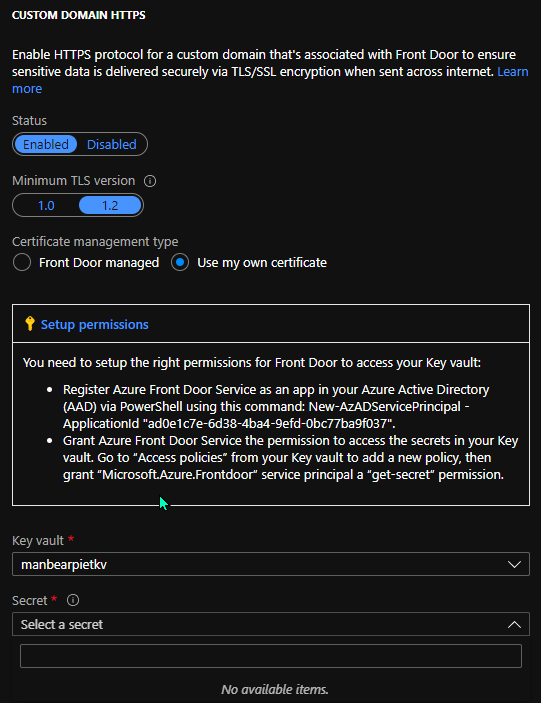
Custom domain HTTPS
To facilitate safe browsing to your website/app you can enable HTTPS to your custom domain. There is a toggle to select a minimum TLS versions with options for 1.0 and 1.2. There is no support for TLS 1.3 yet.
One of the cool features of Azure Front Door are free Front Door Managed Certificates for your custom domains. With this option you don’t have to worry about where to save your certificates or to make sure your order and replace them before they expire.
If this is not an option due to regulatory compliance, custom certificates are also an options with Azure Key Vault integration. There are two requirements for this:
- Register Azure Front Door Service as an app in your Azure Active Directory (AAD) via PowerShell
- Do so by using this command:
1New-AzADServicePrincipal -ApplicationId "ad0e1c7e-6d38-4ba4-9efd-0bc77ba9f037"
- Grant Azure Front Door Service the permission to access the secrets in your Key vault.
- Go to “Access policies” from your Key vault to add a new policy, then grant “Microsoft.Azure.Frontdoor” service principal a “get-secret” permission
After which you can select a keyvault, a secret and a secret version (Latest is an option), making replacement of certificates a breeze. Do be aware it can take a while for the certificate to be published at each POP.
Session Affinity
To make sure your users aren’t routed to a different backend(host) with consecutive calls to your stateful webapplication, (cookie based) session affinity is supported by Azure Front Door. This is configured at the frontend domain.
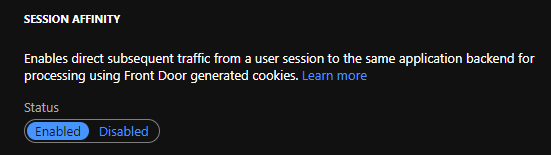
Session timeouts are configurable in the Settings tab. This is the number of seconds before a forwarded send or receive request times out. When a timeout occurs the request fails and the connection terminates.

Backend Pools
Backends in Azure Front Door are the references to endpoints which host your server or webapp. Since it’s the component hosting your website/app, you want to make sure your customers reach the right app/server.
It might be bit confusing, but the backend in case of the Azure Front Door is your web-frontend (hosting your site/app). Backends are grouped in backend pools. Backends usually host the same content at each backend host in the backend pool. Backends in Azure Front Door can be any public endpoint.
Setting up backends
There are some Azure services which can be configered as backends using Azure suggested settings, after selecting your resource. This integration is provided with the following Azure services:
- Azure App Services
- Cloud Services
- Storage Account (for Static websites), classic is also supported
- Application Gateway
- API Management
- Public IP Address
- Traffic Manager
Selecting one of the options above prefills the fields required to register a backend in the backend pool. If your backendtype is not mentioned in the options above, or you want to set it up yourself, then you can use the Custom Host option. Required options are shown in the image below:
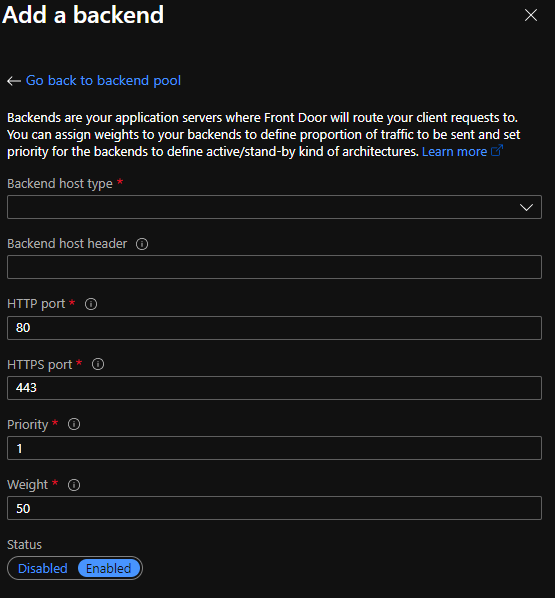
You also have the option to disable backends in your backend pool, doing so traffic will be routed to different backends. If there are no backends available in the pool, requests will throw a recognizable Front Door white error screen with an error code.
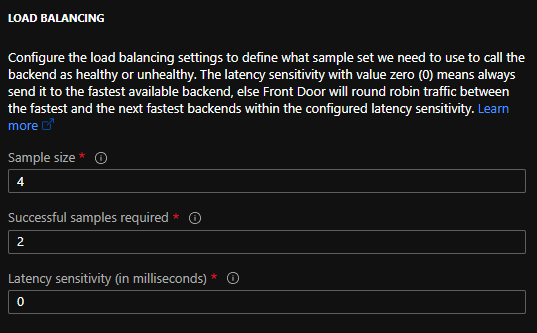
Backend traffic routing options
The load balancing functionality of Azure Front Door is found in the fact that it can load balance between multiple backends within a backend pool. Priority and Weight in the image shown at Backend Pools resp. provide functionality for priority based traffic-routing and weighted based traffic-routing.
Priority
Priority on a backend is configurable from 1 to 5, where 1 is the first priority where traffic will be routed to. When the backends with priority 1 are down the backends with priority 2 are used et cetera.
Weighted
Weighted traffic routing is performed by configuring a weight (from 1 to 1000), the default is 50. It’s ratio-based, so the higher the weight of a backend, the more traffic it will receive.
Health probing
Front Door can be configured to assess the health of the backends in your backendpool by polling with HTTP(S) requests with a configurable health probe. The health probes can be configured to use both a HEAD and GET method on a specified path.
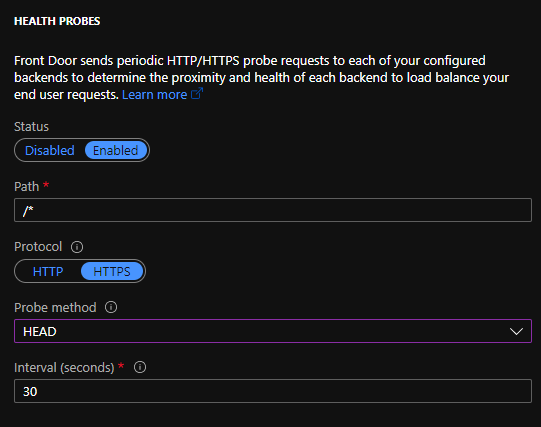
The health probe expects a valid HTTP 200 answer from the backend on a provided path. In case HTTPS probing is used, the server should present itself with a valid certificate containing the entire certificate chain. If the backend host doesn’t provide a certificate from a wellknown CA, traffic is not forwarded.
Whenever a backendhost is not responding with HTTP 200, it’s deemed unhealthy. If all hosts in the backend are unhealthy Front Door throws a white error screen showing an error id. This error id can be used to find the corresponding log in Log Analytics.
For HTTPS traffic there’s also an option available to disable enforcement of certificate namechecks. This option which is Enabled by default, it ensures that the backend host presents with a certificate where the hostname is contained in the subject of the certificate. Certificates must be issued by a valid certificate authority, it must contain the complete certificate chain.

Routing Rules
With configured domains and backends to host our web(apps), the last and in my opinion most challenging topic are the so called Routing rules. These rules can be configured to forward traffic to backends, based on the front-end domain, a backend pool and the requested path. The decision how this is rule application performed is done with path pattern matching.
You can create multiple routing rules per frontend domain and add multiple domains per routing rule. There are some gotcha’s though, these are adressed at the respective topics.
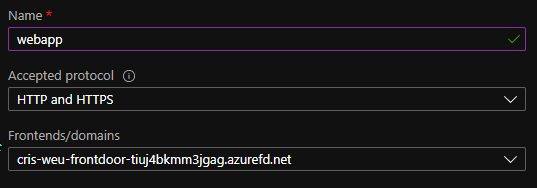
Frontend domains
When creating a rule you must first you must name the rule and select the frontend(s) you want to route traffic for, then you select which protocol is accepted for that frontend(s).
Pattern Matching
To determine which rule will be applied pattern matching is applied to the requested url path ie. https://manbearpiet.github.io/posts/. In case multiple rules are applicable, the most specific rule will be applied.
In case none of the rules is matched a 404 error will be thrown.
The most simple way to route traffic to backends is to use a catch-all wildcard, /*.
This will account for anything, but aware that you can only create one rule with a wildcard for a frontend domain.
For example:
| Rule | Pattern |
|---|---|
| 1 | /* |
| URL | Match | Matched Rule |
|---|---|---|
| https://manbearpiet.github.io/ | 1 | /* |
| https://manbearpiet.github.io/contact | 1 | /* |
| https://manbearpiet.github.io/contactyourlovedones | 1 | /* |
| https://manbearpiet.github.io/posts/ | 1 | /* |
| https://manbearpiet.github.io/posts/my-first-post/ | 1 | /* |
| Rule | Pattern |
|---|---|
| 1 | /* |
| 2 | / |
| URL | Match | Matched pattern |
|---|---|---|
| https://manbearpiet.github.io/ | 2 | / |
| https://manbearpiet.github.io/contact | 1 | /* |
| https://manbearpiet.github.io/contactyourlovedones | 1 | /* |
| https://manbearpiet.github.io/posts/ | 1 | /* |
| https://manbearpiet.github.io/posts/my-first-post/ | 1 | /* |
| Rule | Pattern |
|---|---|
| 1 | /* |
| 2 | / |
| 3 | /contact |
| URL | Match | Matched pattern |
|---|---|---|
| https://manbearpiet.github.io/ | 2 | / |
| https://manbearpiet.github.io/contact | 3 | /contact |
| https://manbearpiet.github.io/contactyourlovedones | 1 | /* |
| https://manbearpiet.github.io/posts/ | 1 | /* |
| https://manbearpiet.github.io/posts/my-first-post/ | 1 | /* |
Rules Engine
After being matched there is an option to perform granular adjustments to the request before it’s redirected or forwarded or to drop it entirely. In example for adding headers, doing HTTP to HTTPS redirect et cetera. Options for this is too extensive for this blog, this will be featured in a seperate blog.
Route Details
After being matched to a routing rule it can have two generic outcomes, a forward to a backend or a HTTP redirect. With a routing rules which performs a forward you’re forwarding to a specific backend. With a HTTP redirecting you’re redirecting the request to a different host, path or query string.
Forwarding to backends
Backend pool
You can select only one backendpool per forwarding rule, also as mentioned earlier it’s possible to supply only one catch all pattern per frontend domain, so be mindful when setting up. Especially when binding multiple frontend domains to 1 routingrule (to 1 backend).
Forwarded protocol
With the forwarded protocol configuration you can select which protocol (HTTP/HTTPS or choose to match the request’ protocol) the request is forwarded with to the backend.It’s possible to use HTTPS for the users connection to Front Door and use http for backend calls if necessary.
Caching options
There are also some caching options with forwarding, these will be adressed in an upcoming blog.
HTTP redirection
When you’re setting up a redirect routing rule you can choose one or a combination of the following, preserving/replacing:
- The destination host
- https://www.example.com/whatdoesmarcelluswallacelooklike?a=switch
- The destination path
- https://www.example.com/whatdoesmarcelluswallacelooklike?a=switch
- The query string
For more information about URL redirection,the Azure Front Door Documentation is really good. It contains good information about the redirect types,
Destination Fragment
There also is an option for a URL destination fragment, this is used to navigate to a specific page section. You might recognize this from a direct link in a section to i.e. Microsoft Docs for example:
- https://docs.microsoft.com/en-us/dotnet/core/introduction#cross-platform , the last segment (#cross-platform), is the destination fragment.
When redirecting you can add a specific destination fragment to add to the redirect URL.
Conclusion
This was my overview of the Azure Front Door service. I hope you enjoyed reading and learned enough about the inners of Front Door. This article became a bit longer than I hoped for, but more is coming up. Other topics that will be featured in seperate future articles are:
- Example setups
- Architectural considerations
- Deployment
- Rules Engine for Routing rules
- Content Delivery Network (CDN)
- Web Application Firewall (WAF)